本文将介绍如何在 Debian 11 和 CentOS7 下编译安装 Nginx
安装约定:
检查安装环境
我们在安装不同的工具软件的时候,需要安装插件的环境关系
检查系统版本:cat /etc/redhat-release
查看是否已安装wget: rpm -qa|wget
(注: Linux 系统中的 wget 是一个下载文件的工具)
否则(结果显示空白)安装:yum -y install wget
安装 g 编译器:默认的云服务器都是会安装的。
查看是否已安装编译器:rpm -qa|gcc
否则(结果显示空白)安装:yum -y install gcc gcc-c++
为什么要装 gcc 编译器?
gcc 是 C 语言编译器
使用 gcc 编译器可以编译语言代码为可执行程序
安装 nginx 依赖 1. nginx 的 Rewrite 模块和 HTTP 核心模块会使用到 PRE 正则表达式语法 1 yum -y install pcre pcre-devel
2. nginx 的各种模块中需要使用 gzip 压缩: 1 yum -y install zlib zlib-devel
3. 安全套接字层密码库 1 yum -y install openssl openssI-devel
4. CentOS 全部依赖: 1 yum install gcc gcc-c++ make unzip pcre pcre-devel zlib zlib-devel libxml2 libxml2-devel readline readline-devel ncurses ncurses-devel perl-devel perl-ExtUtils-Embed openssl-devel -y
5. Debian 全部依赖: 1 apt install -y build-essential libpcre3 libpcre3-dev zlib1g-dev openssl libssl-dev
安装 nginx 1. 下载 nginx wget http://nginx.org/download/nginx-1.14.0.tar.gz 或者下载好直接上传
解压:tar-zxvf nginx-1.14.0.tar.gz
2. 解压 nginx
使用部分配置 1 2 3 4 5 ./configure \ --prefix=/usr/local/src/nginx \ --with-http_ssl_module \ --with-http_stub_status_module \ --with-pcre --with-http_spdy_module
或开启大部分配置 1 2 3 4 5 6 7 8 9 10 11 12 13 14 15 16 17 18 19 20 21 22 23 24 25 26 27 28 29 30 31 32 33 34 35 36 ./configure \ --prefix=/usr/local/src/nginx \ --sbin-path=/usr/local/src/nginx/sbin/nginx \ --conf-path=/usr/local/src/nginx/nginx.conf \ --error-log-path=/var/log/nginx/error.log \ --http-log-path=/var/log/nginx/access.log \ --pid-path=/var/run/nginx.pid \ --lock-path=/var/run/nginx.lock \ --http-client-body-temp-path=/var/cache/nginx/client_temp \ --http-proxy-temp-path=/var/cache/nginx/proxy_temp \ --http-fastcgi-temp-path=/var/cache/nginx/fastcgi_temp \ --http-uwsgi-temp-path=/var/cache/nginx/uwsgi_temp \ --http-scgi-temp-path=/var/cache/nginx/scgi_temp \ --with-file-aio \ --with-threads \ --with-http_addition_module \ --with-http_auth_request_module \ --with-http_dav_module \ --with-http_flv_module \ --with-http_gunzip_module \ --with-http_gzip_static_module \ --with-http_mp4_module \ --with-http_random_index_module \ --with-http_realip_module \ --with-http_secure_link_module \ --with-http_slice_module \ --with-http_ssl_module \ --with-http_stub_status_module \ --with-http_sub_module \ --with-http_v2_module \ --with-mail \ --with-mail_ssl_module \ --with-stream \ --with-stream_realip_module \ --with-stream_ssl_module \ --with-stream_ssl_preread_module
1 2 3 4 5 6 7 8 9 10 11 12 13 14 15 16 17 18 19 20 21 22 23 24 25 26 27 28 29 30 参数说明: 编译选项官方提供的有: –prefix=path 定义一个目录来保存你的nginx的提供功能的文件夹,就这好比我们安装软件的时候软件存放的目录,如果我们在编译的不指定安装位置,那么默认的位置/usr/local/nginx 目录 –sbin-path=path 设置nginx执行脚本的位置,这里如果设置在path变量里面,就可以在bash环境下,任意使用nginx命令,默认位置prefix/sbin/nginx 注意这里的prefix是 在配置文件里面配置的路径 –conf-path=path 配置nginx配置文件的路径,如果不指定这个选项,那么配置文件的默认路径就会是 prefix/conf/nginx.conf –pid-path =path 配置nginx.pid file的路径,一般来说,进程在运行的时候的时候有一个进程id,这个id会保存在pid file里面,默认的pid file的放置位置是prefix/logs/nginx.pid –error-log-path=path 设置错误日志的存放路径,如果不指定,就默认 prefix/logs/error.log –http-log-path= path 设置http访问日志的路径,如果不指定,就默认 prefix/logs/access.log –user=name 设置默认启动进程的用户,如果不指定,就默认 nobody –group=name 设置这个用户所在的用户组,如果不指定,依然是nobody 这些是我们常用的编译选项,其他的可以均保持默认,如需特殊指定,可上nginx官网查阅 http://nginx.org/en/docs/configure.html 下面是一些不常用的选项 –with-http_ssl_module -开启HTTP SSL模块,使NGINX可以支持HTTPS请求。需要安装了OPENSSL –with-http_flv_module –with-http_stub_status_module - 启用 “server status” 页(可有可无) –without-http_gzip_module - 禁用 ngx_http_gzip_module. 如果启用,需要 zlib 。 –without-http_ssi_module - 禁用 ngx_http_ssi_module –without-http_referer_module - 禁用 ngx_http_referer_module –without-http_rewrite_module - 禁用 ngx_http_rewrite_module. 如果启用需要 PCRE 。 –without-http_proxy_module - 禁用 ngx_http_proxy_module –without-http_fastcgi_module - 禁用 ngx_http_fastcgi_module –without-http_memcached_module - 禁用 ngx_http_memcached_module –without-http_browser_module - 禁用 ngx_http_browser_module –http-proxy-temp-path=PATH - Set path to the http proxy temporary files –http-fastcgi-temp-path=PATH - Set path to the http fastcgi temporary files –without-http - 禁用 HTTP server(用作代理或反向代理) –with-mail - 启用 IMAP4/POP3/SMTP 代理模块 –with-mail_ssl_module - 启用 ngx_mail_ssl_module –with-openssl=DIR - Set path to OpenSSL library sources
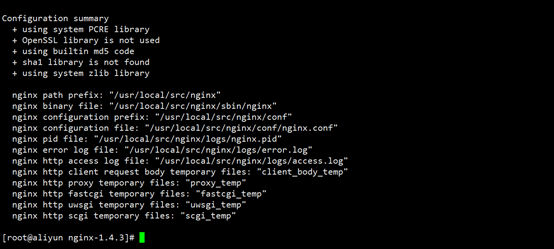
3. 编译并安装 4. 创建并设置 nginx 运行账号(本章节是为了提高服务器的访问权限控制——可跳过,不影响个人使用) group add nginx
user add -M -g nginx -s /sbin/nologin nginx(手动创建一个用户,不想让用户登录系统)
cd /usr/local/src/nginx/config
(注: M:不要自动建立用户的登入目录。)
s 是指定用户登入后所使用的 she11 。默认值为 /bin/bash 。如果不想让用户登录系统可以用 -s /sbin/nologin 此用户就不可以登录系统
5. 设置 nginx 为系统服务 在文件夹 /lib/systemd/system 新建文件 nginx.service
文件创建:touch nginx.service
vim /lib/systemd/system/nginx.service
写入:
1 2 3 4 5 6 7 8 9 10 11 [Unit] Description=nginx After=network.target [Service] Type=forking ExecStart=/usr/local/src/nginx/sbin/nginx ExecReload=/usr/local/src/nginx/sbin/nginx -s reload ExecStop=/usr/local/src/nginx/sbin/nginx -s stop PrivateTmp=true [Install] WantedBy=multi-user.target
6. 启动 nginx 如果出现
那么输入
1 2 systemctl daemon-reload reboot
再重新启动 nginx 即可
nginx 平滑升级 tips:演示版本将会从 nginx 1.21.6 => nginx 1.22.1
查看当前 nginx 版本(请先配置 nginx 环境变量或进入 nginx 的 sbin 目录中):
1 2 3 4 5 6 [root@server sbin]# nginx -V nginx version: nginx/1.21.6 built by gcc 4.8.5 20150623 (Red Hat 4.8.5-44) (GCC) built with OpenSSL 1.0.2k-fips 26 Jan 2017 TLS SNI support enabled configure arguments: --prefix=/usr/local/src/nginx --with-http_ssl_module --with-http_stub_status_module --with-pcre --with-http_ssl_module
下载、解压并进入 nginx 1.22.1 的解压目录下
1 2 3 wget http://nginx.org/download/nginx-1.22.1.tar.gz tar -zxvf nginx-1.22.1.tar.gz cd nginx-1.22.1/
配置安装选项
1
2
3
4
5
6
7
8
9
10
11
12
13
14
15
16
17
18
19
20
21
22
23
24
25
26
27
28
29
30
31
32
33
34
35
36
./configure \ --prefix=/usr/local/src/nginx \ --sbin-path=/usr/local/src/nginx/sbin/nginx \ --conf-path=/usr/local/src/nginx/nginx.conf \ --error-log-path=/var/log/nginx/error.log \ --http-log-path=/var/log/nginx/access.log \ --pid-path=/usr/local/src/nginx/logs/nginx.pid \ --lock-path=/var/run/nginx.lock \ --http-client-body-temp-path=/var/cache/nginx/client_temp \ --http-proxy-temp-path=/var/cache/nginx/proxy_temp \ --http-fastcgi-temp-path=/var/cache/nginx/fastcgi_temp \ --http-uwsgi-temp-path=/var/cache/nginx/uwsgi_temp \ --http-scgi-temp-path=/var/cache/nginx/scgi_temp \ --with-file-aio \ --with-threads \ --with-http_addition_module \ --with-http_auth_request_module \ --with-http_dav_module \ --with-http_flv_module \ --with-http_gunzip_module \ --with-http_gzip_static_module \ --with-http_mp4_module \ --with-http_random_index_module \ --with-http_realip_module \ --with-http_secure_link_module \ --with-http_slice_module \ --with-http_ssl_module \ --with-http_stub_status_module \ --with-http_sub_module \ --with-http_v2_module \ --with-mail \ --with-mail_ssl_module \ --with-stream \ --with-stream_realip_module \ --with-stream_ssl_module \ --with-stream_ssl_preread_module
设置 nginx 平滑升级
1 2 3 4 5 6 7 8 [root@server nginx-1.22.1] /usr/local/src/nginx/sbin/nginx -t nginx: the configuration file /usr/local/src/nginx/conf/nginx.conf syntax is ok nginx: configuration file /usr/local/src/nginx/conf/nginx.conf test is successful kill -USR2 `cat /usr/local/src/nginx/logs/nginx.pid`sleep 1test -f /usr/local/src/nginx/logs/nginx.pid.oldbinkill -QUIT `cat /usr/local/src/nginx/logs/nginx.pid.oldbin`
make install 安装
1 2 3 4 5 6 7 8 9 10 11 12 13 14 15 16 17 18 19 20 21 22 23 24 25 26 27 28 29 30 31 32 33 34 35 36 37 38 39 40 41 42 43 44 45 [root@server nginx-1.22.1] make -f objs/Makefile install make[1]: Entering directory `/opt/nginx-1.22.1' test -d ' /usr/local/src/nginx' || mkdir -p ' /usr/local/src/nginx' test -d ' /usr/local/src/nginx/sbin' \ || mkdir -p ' /usr/local/src/nginx/sbin' test ! -f ' /usr/local/src/nginx/sbin/nginx' \ || mv ' /usr/local/src/nginx/sbin/nginx' \ ' /usr/local/src/nginx/sbin/nginx.old' cp objs/nginx ' /usr/local/src/nginx/sbin/nginx' test -d ' /usr/local/src/nginx' \ || mkdir -p ' /usr/local/src/nginx' cp conf/koi-win ' /usr/local/src/nginx' cp conf/koi-utf ' /usr/local/src/nginx' cp conf/win-utf ' /usr/local/src/nginx' test -f ' /usr/local/src/nginx/mime.types' \ || cp conf/mime.types ' /usr/local/src/nginx' cp conf/mime.types ' /usr/local/src/nginx/mime.types.default' test -f ' /usr/local/src/nginx/fastcgi_params' \ || cp conf/fastcgi_params ' /usr/local/src/nginx' cp conf/fastcgi_params \ ' /usr/local/src/nginx/fastcgi_params.default' test -f ' /usr/local/src/nginx/fastcgi.conf' \ || cp conf/fastcgi.conf ' /usr/local/src/nginx' cp conf/fastcgi.conf ' /usr/local/src/nginx/fastcgi.conf.default' test -f ' /usr/local/src/nginx/uwsgi_params' \ || cp conf/uwsgi_params ' /usr/local/src/nginx' cp conf/uwsgi_params \ ' /usr/local/src/nginx/uwsgi_params.default' test -f ' /usr/local/src/nginx/scgi_params' \ || cp conf/scgi_params ' /usr/local/src/nginx' cp conf/scgi_params \ ' /usr/local/src/nginx/scgi_params.default' test -f ' /usr/local/src/nginx/nginx.conf' \ || cp conf/nginx.conf ' /usr/local/src/nginx/nginx.conf' cp conf/nginx.conf ' /usr/local/src/nginx/nginx.conf.default' test -d ' /usr/local/src/nginx/logs' \ || mkdir -p ' /usr/local/src/nginx/logs' test -d ' /var/log/nginx' \ || mkdir -p ' /var/log/nginx' test -d ' /usr/local/src/nginx/html' \ || cp -R html ' /usr/local/src/nginx' test -d ' /var/log/nginx' \ || mkdir -p ' /var/log/nginx' make[1]: Leaving directory `/opt/nginx-1.22.1'
查看 nginx 版本号:
1 2 3 4 5 6 [root@server nginx] nginx version: nginx/1.22.1 built by gcc 4.8.5 20150623 (Red Hat 4.8.5-44) (GCC) built with OpenSSL 1.0.2k-fips 26 Jan 2017 TLS SNI support enabled configure arguments: --prefix=/usr/local/src/nginx --sbin-path=/usr/local/src/nginx/sbin/nginx --conf-path=/usr/local/src/nginx/nginx.conf --error-log-path=/var/log/nginx/error.log --http-log-path=/var/log/nginx/access.log --pid-path=/usr/local/src/nginx/logs/nginx.pid --lock-path=/var/run/nginx.lock --http-client-body-temp-path=/var/cache/nginx/client_temp --http-proxy-temp-path=/var/cache/nginx/proxy_temp --http-fastcgi-temp-path=/var/cache/nginx/fastcgi_temp --http-uwsgi-temp-path=/var/cache/nginx/uwsgi_temp --http-scgi-temp-path=/var/cache/nginx/scgi_temp --with-file-aio --with-threads --with-http_addition_module --with-http_auth_request_module --with-http_dav_module --with-http_flv_module --with-http_gunzip_module --with-http_gzip_static_module --with-http_mp4_module --with-http_random_index_module --with-http_realip_module --with-http_secure_link_module --with-http_slice_module --with-http_ssl_module --with-http_stub_status_module --with-http_sub_module --with-http_v2_module --with-mail --with-mail_ssl_module --with-stream --with-stream_realip_module --with-stream_ssl_module --with-stream_ssl_preread_module
nginx 的 config 文件语法高亮 1. 进入 nginx 的源码文件 1 cd /usr/local/src/nginx-1.18.0/contrib/vim/syntax
2. 将该文件夹下的 nginx.vim 复制到 ~/.vim/syntax/ 文件夹下,并且在 ~/.vim/filetype.vim 文件中 1 echo "au BufRead,BufNewFile /usr/local/src/nginx/conf/* set ft=nginx" >> /root/.vim/filetype.vim
额外内容 https://xinx.top/archives/45.html
1 yum install kernel-headers
Nginx 官网 启动脚本
https://www.nginx.com/resources/wiki/start/topics/examples/redhatnginxinit/